The WordPress block editor also called the block editor, WordPress editor or Gutenberg editor is the new way of publishing content in WordPress.
Following the launch of WordPress 5.0 in December 2018, the WordPress block editor was set as the default editor and replaced the classic editor. To use the classic editor, you will need to install the classic editor plugin.
The WordPress block editor offers an array of blocks that can be used to create media-rich pages and posts.
Blocks are the content elements that you add to create content layouts. You can add blocks for paragraphs, images, headings, lists, videos, galleries, and more. You can control the layout of the blocks with ease, to build visually appealing web pages.
WordPress has blocks for all common content elements, and more can be added through WordPress plugins.
The block editor’s workspace
To launch the WordPress block editor, click on Posts > Add New or Pages > Add New.

The block editor opens by default in fullscreen mode.

The WordPress block editor workspace has three main sections:
- the top toolbar
- the sidebar with the post/page settings and the block settings
- the content area.
The top toolbar
Before you publish your post or page, you will see the following options in the top toolbar.

After the publishing, you will see the following options.

The options corresponding to the numbers in the figure are as followings:
1. View Posts / View Pages
Shows the W icon by default, or the Site Icon if available. Click to exit the editor and back to the list of Posts or Pages in Administrator Screens. This will prompt you to save the changes or leave the post or page.
2. Toggle block inserter
Show or Hide block inserter that allows users to add block, patterns or media to your post or page.
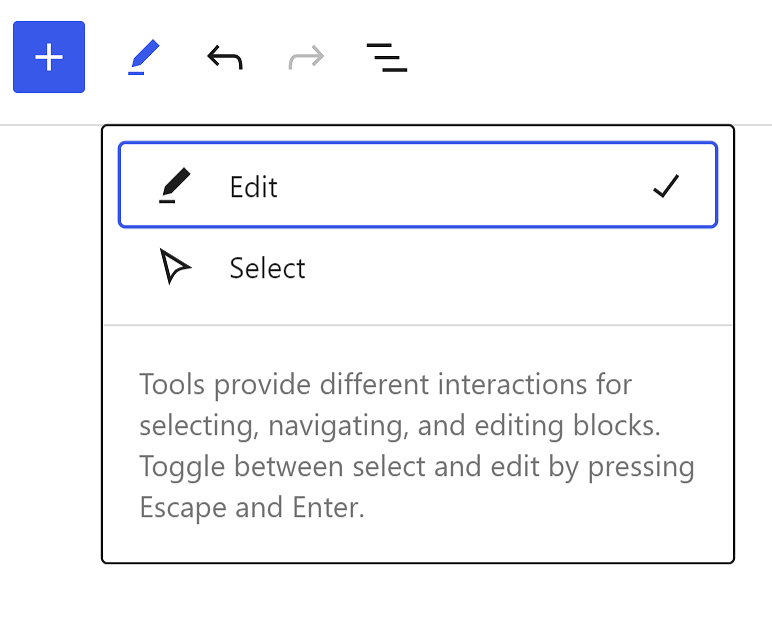
3. Tools
Switch between editing a block and selecting a block. Choose the Select tool (or press the Escape key on your keyboard) to select individual blocks. Once a block is selected, press the Enter key on your keyboard to return to editing.
4. Undo and Redo
Undo an action, or redo an undone action.
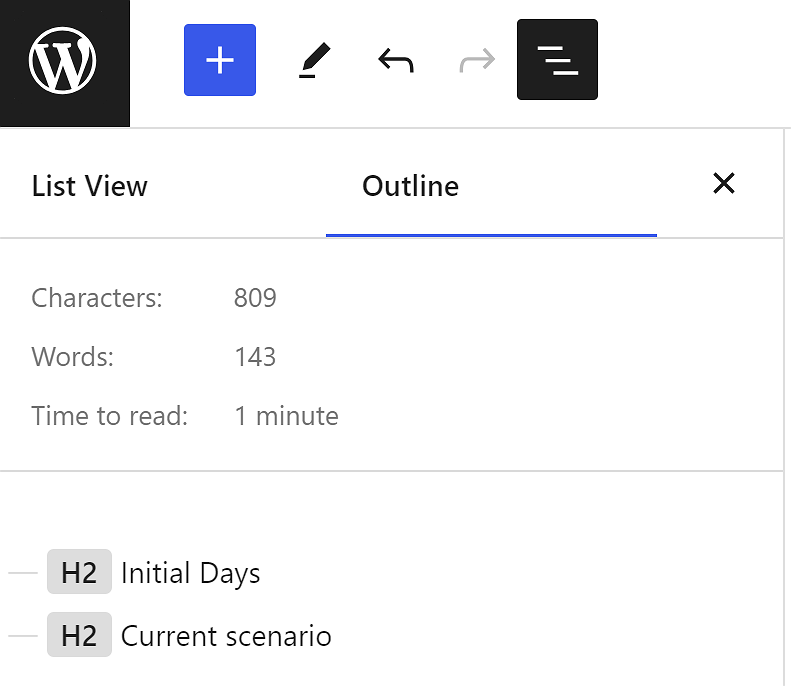
5. Document Overview
This option includes two tabs: List View and Outline.
- List View: a list of all of the blocks that are on the post/page and easily navigate between the blocks on your post/page. Read more about List View tool.
- Outline: Show the the post/page details including the character and word count, estimated time to read, the number of paragraphs and blocks on the post/page, and the document outline showing the headings and how they are structured on the post/page.
6. Command Palette
The Command Palette helps you streamline your workflow in the WordPress editor by providing a centralized location to work on various aspects of your site’s design. Click this field, or press Cmd+k on Mac or Ctrl+k on Windows. For more details about Command Palete, refer Editor Command Palette.
7. Save draft / Saved
Save a draft of your post or page without publishing it. If the post or page is saved successfully, the label changes to Saved. Once the post or page is published, this label is hidden.
8. View
View how your post/page looks on your site with the current changes applied. For more details, refer How to use the View feature.
9. Zoom Out
The Zoom out mode allows users to zoom out to edit and create at the pattern level over granular block editing.
10. Settings
Show or hide the post/page sidebar settings and the block settings.
11. Publish
Make your post/page available publicly.
12. Options
Open up more options. See below section.
13. View Post / View Page
After you publish your post or page, you will see this option. Opens a new tab where you can see how your post/page looks on the frontend.
More options

If you click the three dots icon in the top toolbar, additional options are displayed. Here, you can customize your editing experience using various options.
View
- Top toolbar: Display or hide the top toolbar in the editor. When you enable this option, block toolbars are pinned to the top of the WordPress block editor (right under the top toolbar) instead of appearing directly above the block.
- Distraction free: When enabled, this option allows you to focus just on your words by adjusting various pieces of the interface, including closing any open sidebars, removing various block inserter options, and the block toolbar. Read more here.
- Spotlight mode: With spotlight mode, all blocks are greyed out except for the one you’re working on so that you can focus on a single block at a time.
- Fullscreen mode: When enabled, this mode hides the Administration screens user interface.
Editor
By default, you will be in the Visual editor. Switch to the Code editor to view the entire post or page in the HTML code editor.
Tools
Here, you can manage patterns, learn keyboard shortcuts, visit the WordPress block editor welcome guide, copy all content on the post/page, or view additional support articles.
Preferences
Use the Preferences menu to:
- Customize the editing experience.
- Change how you interact with blocks and which blocks appear when searching for a block.
- Show or hide individual panels from the post/page settings.
How to work in the WordPress block editor
You can select multiple blocks by holding shift+click as show in the video below:
You can select all blocks by pressing Cmd+A or Control+A as shown in the video below
When you select some text and press the back tick (`), it will turn the selected text inline code as show in the video below:
Uploading media from openverse category also uploads the item in media library.
Related topics
Change Log
- Updated on 2025-01-01
- Updated whole contents and screenshots for 6.7
- Updated on 2023-11-11
- Updated screenshots for 6.4
- Updated on 2023-11-08
- Headings changed to sentence case
- Updated on 2023-09-26
- Updated on 2023-08-
- Updated 2023-08-08
- Replaced “Reusable Blocks” with “Patterns”
- Updated 2023-06-27
- Added links to Gutenberg demo website.
- Updated 2023-04-16
- Updated screenshot for more options.
- Added information about Distraction Free mode.
- Updated 2022-10-24
- Add screenshot for Time to read.
- Updated screenshots to show the View button in the top toolbar
- Content tweaked. FAQ removed.
- Added new videos to show tips to work with the Editor
- Update 2022-06-02
- Text updated for clarity.
- Update 2022-05-13
- Updated content/screenshots for 6.0.
- Rewrote sections for clarity.
- The blocks section moved to a new page.
- Update 2022-01-18
- Added Section: List view
- Update 2020-08-17
- Added Section: New to WordPress 5.5
- Added link to Block Directory page.
- Update 2020-03-29
- Added section on default Fullscreen mode, introduced in WordPress 5.4
- Update 2020-03-19
- Move the “Shortcuts” section above the FAQs
- Update 2020-03-18
- Changed occurrences of “new editor” to “block editor”
- changed occurrences of “old editor” to “Classic editor”
- Added Anatomy of a Block graphic and explanations
- Reformatted the FAQ questions to Paragraphs with medium size bolded text instead of Capitalized H5
- Added link to Classic Block page and Shorcode Block page
- Changed the link to the Shortcut list to the developer documentation page.
Was this article helpful? How could it be improved?
Log in to submit feedback. If you need support with something that wasn't covered by this article, please post your question in the support forums.